
개발부터 자유까지
[Flutter] UI 그리기 연습(3) - 반복되는 버튼을 하나의 위젯으로 본문
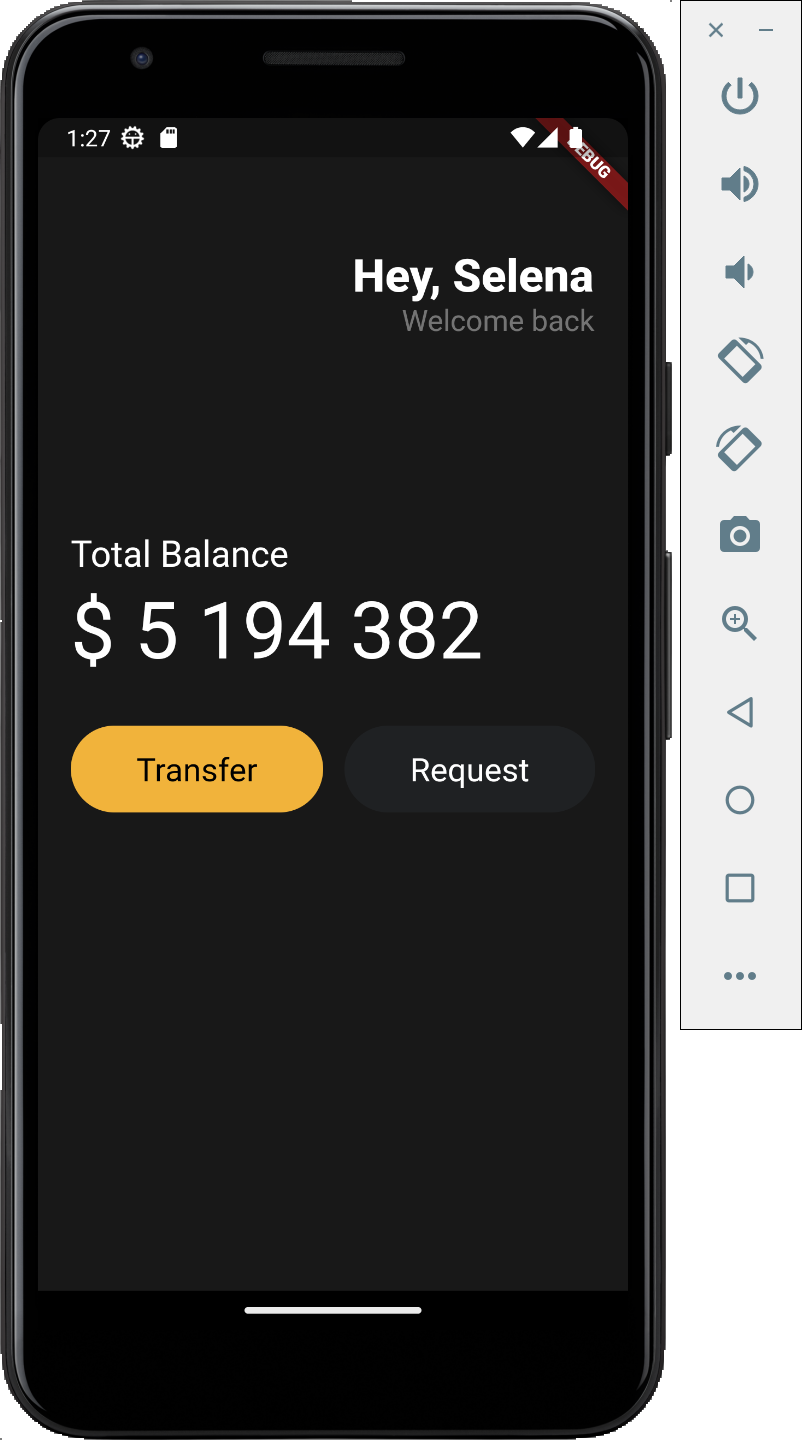
- UI 그리기 연습 시리즈는 아래 링크의 홈화면을 그려보는 포스팅입니다.
https://dribbble.com/shots/19858341-Finnancial-Mobile-IOS-App
Financial Mobile IOS App
dribbble.com
- 코드 설명 (코드 작성 순서로)
- 이전 포스팅에서 Container 위젯으로 버튼을 만들었는데, Container 위젯을 반복하지말고, Button 클래스를 만들어서 위젯으로 사용할 예정입니다.
- Button.dart 파일에 Button 클래스를 생성합니다. Button 클래스는 StatelessWidget 위젯을 상속받는 형태입니다. 버튼이 두개이기 때문에 main.dart에서 Button 클래스의 생성자를 호출할때마다 글자, 배경색, 글자색을 다르게 지정해줄 수 있기 위함입니다. Button 클래스안에 text, bgColor, textColor 지역변수를 선언하고 생성자를 정의합니다.
- 계속해서 build 메소드 안에서 main.dart에서 작성했던 Container 위젯을 가져와 리턴합니다. 글자, 배경색, 글자색 부분을 지역 변수(text, bgColor, textColor)로 바꿔줍니다.
- main.dart에 Button.dart 파일을 import 하고 Conatiner 위젯 자리에 Button 클래스를 호출합니다.
- 버튼이 두개이기 때문에 Button 클래스가 가지고 있는 지역변수를 각각 다르게 할당합니다.
- 두 버튼이 속해있는 Row의 mainAxisAlignment 속성에 MainAxisAlignment.spaceBetween 값으로 두 버튼을 보기 좋게 떨어뜨린다.
- 끝!
// lib/main.dart

import 'package:flutter/material.dart';
import 'package:flutter_application_1/widgets/Button.dart';

void main() {
  runApp(const App());
}

class App extends StatelessWidget {
  const App({super.key});

  @override
  Widget build(BuildContext context) {
    return MaterialApp(
      home: Scaffold(
        backgroundColor: const Color(0xFF181818),
        body: Padding(
          padding: const EdgeInsets.symmetric(horizontal: 20),
          child: Column(
            crossAxisAlignment: CrossAxisAlignment.start,
            children: [
              const SizedBox(height: 80),
              Row(
                mainAxisAlignment: MainAxisAlignment.end,
                children: [
                  Column(
                    crossAxisAlignment: CrossAxisAlignment.end,
                    children: [
                      const Text(
                        "Hey, Selena",
                        style: TextStyle(
                          color: Colors.white,
                          fontSize: 28,
                          fontWeight: FontWeight.w800,
                        ),
                      ),
                      Text(
                        "Welcome back",
                        style: TextStyle(
                          color: Colors.white.withOpacity(0.4),
                          fontSize: 18,
                        ),
                      ),
                    ],
                  ),
                ],
              ),
              const SizedBox(
                height: 120,
              ),
              const Text(
                "Total Balance",
                style: TextStyle(
                  fontSize: 22,
                  color: Colors.white,
                ),
              ),
              const SizedBox(
                height: 5,
              ),
              const Text(
                "\$ 5 194 382",
                style: TextStyle(
                  fontSize: 48,
                  color: Colors.white,
                ),
              ),
              const SizedBox(
                height: 30,
              ),
              const Row(
                mainAxisAlignment: MainAxisAlignment.spaceBetween,
                children: [
                  Button(
                    text: "Transfer",
                    bgColor: Color(0xFFF1B33B),
                    textColor: Colors.black,
                  ),
                  Button(
                    text: "Request",
                    bgColor: Color(0xFF1F2123),
                    textColor: Colors.white,
                  ),
                ],
              ),
            ],
          ),
        ),
      ),
    );
  }
}
// lib/widgets/Button.dart
import 'package:flutter/material.dart';
class Button extends StatelessWidget {
final String text;
final Color bgColor;
final Color textColor;
const Button({
super.key,
required this.text,
required this.bgColor,
required this.textColor,
});
@override
Widget build(BuildContext context) {
return Container(
decoration: BoxDecoration(
color: bgColor,
borderRadius: BorderRadius.circular(45),
),
child: Padding(
padding: const EdgeInsets.symmetric(horizontal: 40, vertical: 15),
child: Text(
text,
style: TextStyle(
fontSize: 20,
color: textColor,
),
),
),
);
}
}
'Flutter' 카테고리의 다른 글
| [Flutter] UI 그리기 연습(5) - 반복되는 카드를 하나의 위젯으로 (0) | 2023.08.07 |
|---|---|
| [Flutter] UI 그리기 연습(4) - 카드 만들기 (0) | 2023.07.25 |
| [Flutter] UI 그리기 연습(2) - 버튼 그리기 (0) | 2023.07.11 |
| [Flutter] UI 그리기 연습(1) (0) | 2023.07.08 |
| 리눅스 우분투에 Flutter 환경 설정 (0) | 2023.06.12 |
'Flutter' Related Articles
more


